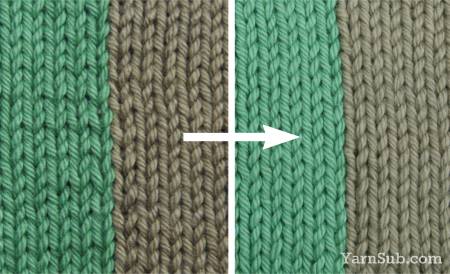
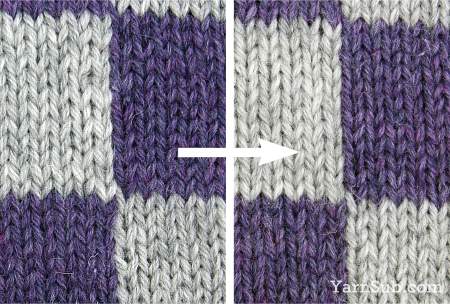
Despite being a devotee of intarsia knitting, for a long time I wasn't happy with the look of my stitches close to color changes, especially around vertical lines. I wanted smooth, consistent fabric but what I got was oversized stitches alternating with undersized stitches. Not pretty. When I tried to tighten them up, they looked even worse! I kept experimenting though, and finally worked out what causes my uneven stitches and how to fix them.
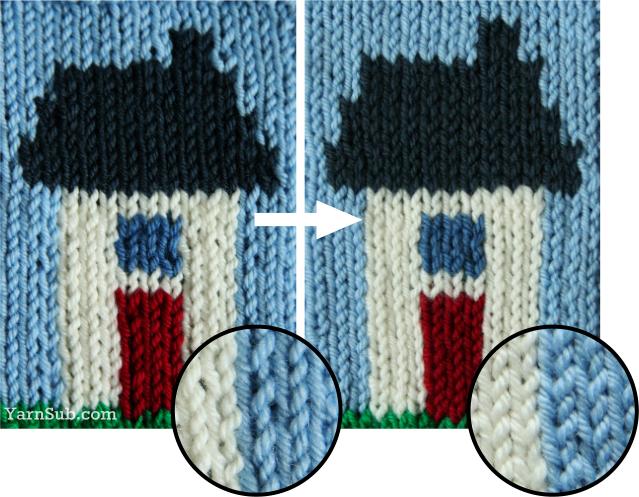
With intarsia knitting, you're coloring a picture into the fabric, one row at a time. It's different to fair-isle knitting, where two colors (or more if you're really brave) are carried the whole length of the row. With intarsia, you use a color only for as long as it's needed, twist that yarn around the next color to prevent a gap, then continue along the row with the new color, leaving the original color behind.
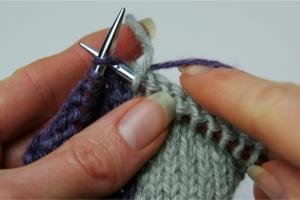
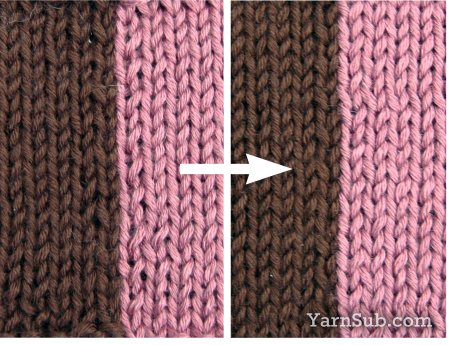
Each time you stop working with a color, you create an end-of-row as far as that yarn is concerned - and you can't help but leave an enlarged, loopy stitch at the end of a row.
Usually the end of a row is at the edge of the fabric, so it can be fixed by slipping the first stitch of the next row, or by concealing it in a seam. With intarsia there's no hiding place for the enlarged end-of-row stitches, as they're right in the middle of the fabric!
Why are end-of-row stitches enlarged?
All stitches are made temporarily bigger as they're worked, but the excess yarn is pulled out again by working the next stitch. For the final stitch in a row there is no next stitch. It feels like you should be able to remove the excess by pulling on the working yarn but that doesn't work because the enlarged stitch is in the row below the stitches on the needle.


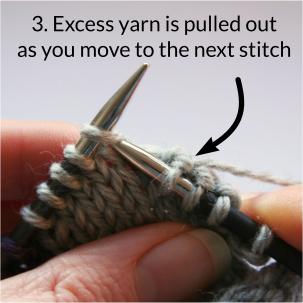
If your instinct tells you (like mine did) to try and fix the large stitches at color changes by pulling the yarn tight as you change color, you only make the new stitch on the needle smaller, you don't change the size of the enlarged stitch sitting in the row below. The relative difference between the stitches in the two rows then becomes even greater, and the edge of that color looks even worse!
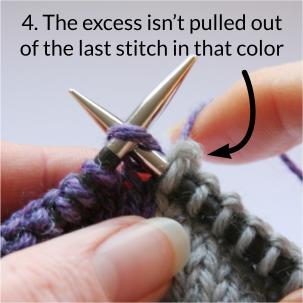
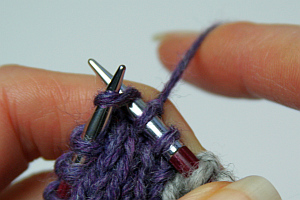
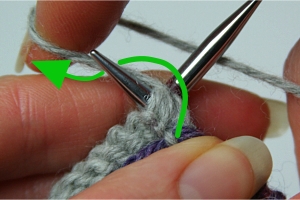
You can temporarily remove the excess yarn from the enlarged stitch using the new color that you're about to knit with, and pulling on the locking-loop formed in the previous row. Unfortunately there's nothing to hold it there, and the excess easily works its way back into the stitch.
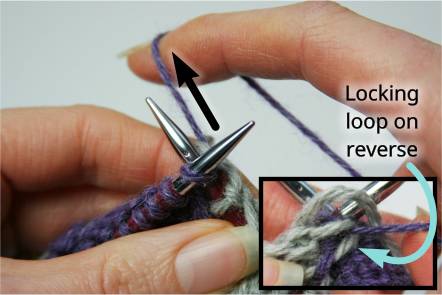
Pulling on the locking loop to remove excess yarn from the last stitch worked.
What's the solution?
The only permanent way to get an end-of-color stitch of the right size, is for it to start smaller than the rest of the stitches. The last stitch worked in a color was the first stitch made in that color on the row before. So you have to plan ahead, and make the first stitch (or two) after a color change with less yarn than normal.
I've tried lots of ways to form the first stitches in a new color at a consistently small enough size, while—crucially—not taking yarn out of the stitch in the row below. I get the best results using different techniques depending on whether I'm knitting or purling.
Technique for knit rows
This is the 'brute force' technique, which involves pulling the first two stitches after a color change very tight. The key is not to pull on the yarn until after the first couple of new stitches are made in the row, else you just make the stitch on the row below smaller.
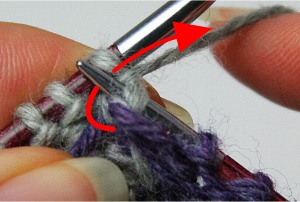
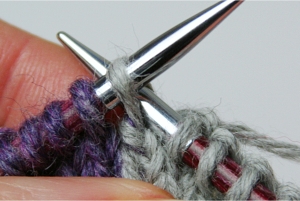
1. Lock the two colors together by taking the finished color forwards and over, and bring the new color up from behind. Don't pull on the yarn at this point; you don't want to make the stitch that you're about to work any smaller.

2. Knit the first two stitches in the new color and insert the needle into the third stitch.
3. Pull as much yarn as you can out of the first two stitches, stopping before you take yarn out of the stitch on the row below.
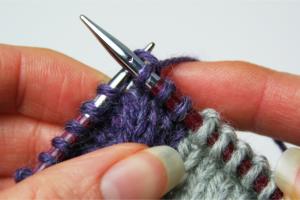
4. Knit the third stitch without letting yarn back into the first two stitches and knit on in your usual tension.
Technique for purl rows
For purl, forming the first stitch of the new color backwards works well. This just means taking the yarn the 'wrong' way—a shorter route—around the needle. The consequence of this is that you leave the new stitch mounted the 'wrong' way on the needle. To avoid making a twisted stitch, you must knit into the back of it when you work it on the next row.
I've been using this technique for a while now and I find knitting into the back of that stitch to avoid twisting it comes automatically, so I hope that most people don't find this causes problems.
1. When purling the first stitch in a new color, take the yarn the 'wrong' way around the needle. Work the stitch tightly, though be careful not to pull yarn out of the final stitch on the row below.
2. Purl the second stitch tightly too, but take the yarn the normal way around the needle.
3. In the following row, knit into the back of the stitch that you purled 'the wrong way' (i.e. the last stitch before the color change) to avoid having a twisted stitch.
I've also made a video showing the technique.
Different fibers
I've tried the technique with a variety of yarns and fibers—including wool, cotton and silk—and found a big improvement with everything I've tried. The trickiest yarns are the super-stretchy s-on-s plied merinos. They just keep stretching so it's easy to pull too hard and take yarn out of the stitch in the row below.
Cotton : Normal intarsia -→ first stitches smaller.
Wool: Normal intarsia → first stitches smaller
Silk : Normal intarsia -→ first stitches smaller
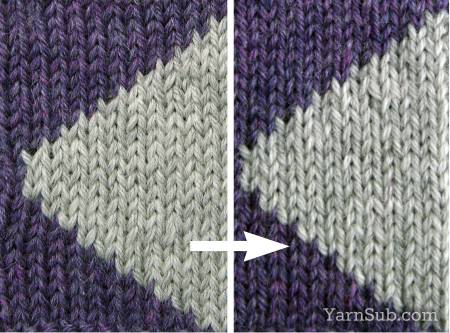
Diagonal color changes
If the color change is diagonal rather than vertical, tension problems tend to be less noticeable. This is especially the case with a right-leaning diagonal, where the excess yarn is pulled into, and held by, the lock between the two colors. The brute-force-and-backwards-purl technique still works, but you might decide it's not worth the hassle.
To sum up, I can't claim that this technique gives tension perfection, but I use it and love it, and wish I'd worked it out earlier in my intarsia career!
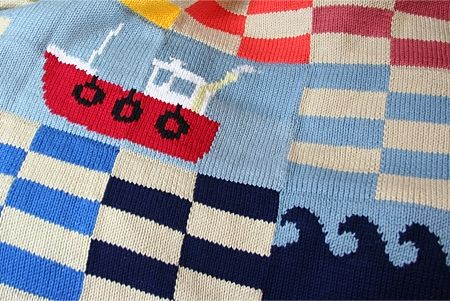
Part of a blanket design inspired by Sebastian West's Fish Festival and used with his permission.
If you have any questions or comments send an email to hello@yarnsub.com or leave a comment on the YarnSub Facebook page.