When starting a new color, most techniques leave you with loose stitches either side of the color change. These not only look ugly but also expand as you work them on the next row, which can be unnerving especially if the tail looks like it might escape completely from the stitch below. You could stop knitting after a few stitches and tie a knot with the yarn tails, but that stops the flow of knitting, and the knots sometimes work their way through to the front.
If you join many new colors in one area, as you might with intarsia, it can be difficult to make them neater even when you sew in the ends. I have previously found myself shuffling yarn back towards the join through many stitches to get them to a consistent size.
To avoid all these issues, the join I use is a "twist-and-weave", first shown to me in a workshop taught by Jane Crowfoot. The new and old colors are twisted together and the join is made more robust by weaving the tail of the new color into the next stitch.
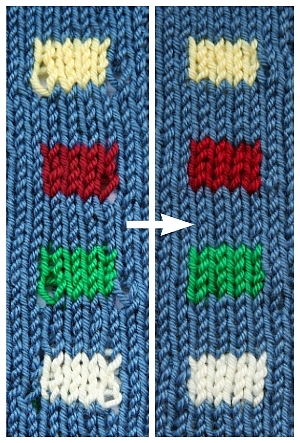
For both pieces of knitting: the join has been tightened up once and no ends have been sewn in at the back.
It's not just for new colors
I use this join almost every time I change to a new yarn. For fair-isle/stranded knitting it sets you up to continue weaving ends in neatly across the first few stitches of the row. For stripes and intarsia, it keeps the integrity of the fabric as you're working, meaning you're not dealing with the loose stitches. Depending on whether the back of my work will be visible, I often use this method even if I need to join in a new skein of yarn of the same color. It takes a lot less effort than a wet splice or a Russian or braided join (as great as these methods are!)
It takes a little practice to get the hang of it, but I think it's worth it. I've not seen it elsewhere since the workshop where I first learnt it (though I'm sure it's out there somewhere) and I think it deserves to be more widely known!
The technique
The technique differs depending on whether you're knitting or purling and whether you're working in the Throwing/English/American knitting style or the Picking/Continental style.
Not sure which knitting style you use? Generally, if you hold the yarn in your right hand and take the yarn forwards and around the needle to form the stitch, you are "throwing". If you hold the yarn in your left hand and collect yarn for the stitch by moving the right hand needle around the yarn, you are "picking".
- Knit stitch, throwing style
- Purl stitch, throwing style
- Knit stitch, picking style
- Purl stitch, picking style
Alternatively there are two videos: one for knitters who hold the yarn in their right hand, and another for those who hold it in their left hand.
Knit stitch, throwing style
1. Work the final stitch in the old color and insert the needle into the next stitch. Drop the old color to the far side (purl side) of your work.
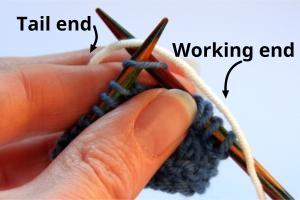
2. Lay the tail end of the new color between the needle tips, holding the tail with the left hand (I clamp it between my first and second fingers).
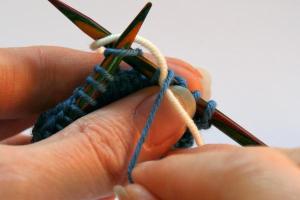
3. Bring the old yarn color from the far side of the work, over the top of the new yarn.
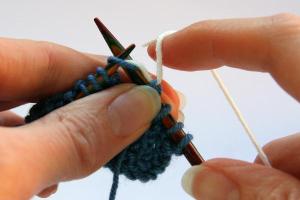
4. Hold the old yarn color firmly with your left thumb, so that you have some tension against the new color as you pick up the working end ready to knit.
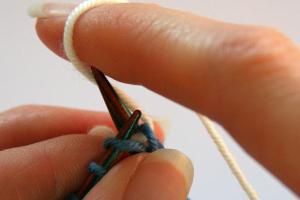
5. Move the working yarn around the tip of the needle to knit the stitch. Keep hold of the tail...
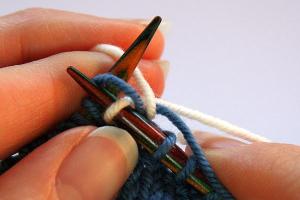
6. ...so that it isn't picked up by the needle and incorporated into the stitch.
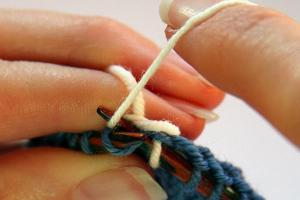
7. Keep hold of the tail as you work the second stitch, and allow the working yarn to catch it against the fabric between the two stitches. Pull gently on the two ends of yarn at the join to neaten.
Purl stitch, throwing style
1. Work the final stitch in the old color and insert the needle into the next stitch. Drop the old color to the far side (knit side) of your work.
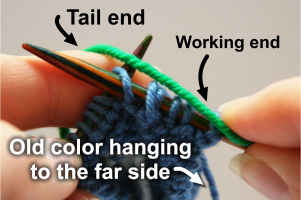
2. Lay the tail end of the new color between the needle tips, holding onto the tail with the left hand (I clamp it between my first and second fingers).
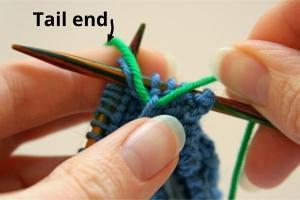
3. Bring the old color from the far side of the work, over the top of the new color, and hold it firm with your left thumb.
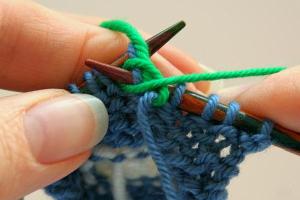
4. Purl the stitch with the working end of yarn, making sure that the tail end is held out of the way...
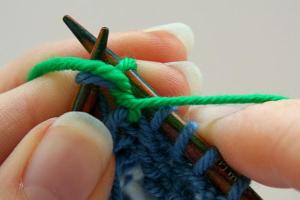
5. ...so that it isn't picked up by the needle and incorporated into the stitch.
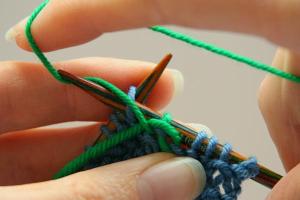
6. Keep the tail end of yarn down as you work the second stitch, and allow the working yarn to catch it against the fabric between the two stitches. Pull gently on the two ends of yarn at the join to make it neater and firmer.
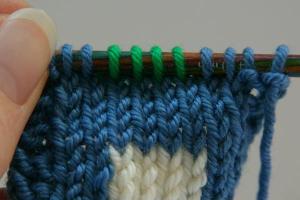
7. Front of the work, with a neat color change.
Knit stitch, picking style
1. Work the final stitch in the old color and insert the needle into the next stitch. Drop the old color to the far side (purl side) of your work.
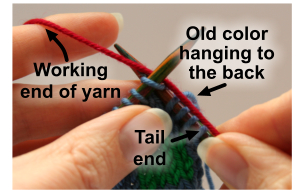
2. Pick up the tail end of the new color in your right hand and lay the yarn between the two needle tips. Hold the working end of yarn in your usual way.
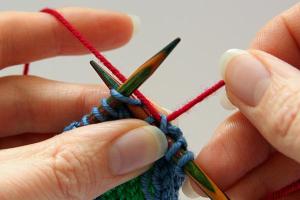
3. Keeping the tail of the new color in place with your left thumb, bring the old color from the far side of the work over the top of the new color. Hold both in place with the left thumb.
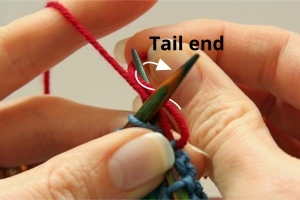
4. Hold the working end of the new yarn above and to the left of the right hand needle, then move the tail end over then down and around that needle tip. Keep hold of the tail with your right hand.
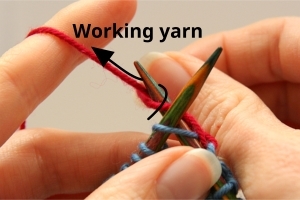
5. Move the working end of yarn over (left to right) and around the right hand needle as if to knit, but instead of forming the stitch...
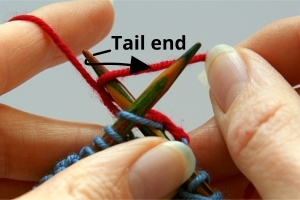
6 ...bring the tail end of yarn back over the needle (left to right)...
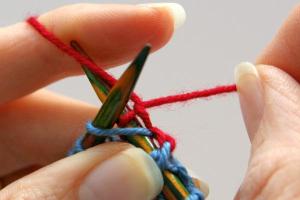
7. ...bringing the working end of yarn with it, which will form the new stitch.
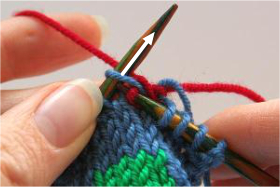
8. Finish knitting the stitch in the usual way (i.e. push the worked stitch off the left needle).
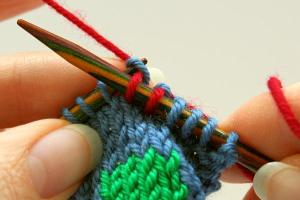
9. Knit the following stitch and then neaten the join by gently pulling both ends of yarn.
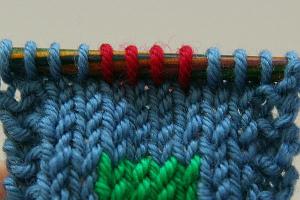
10. Neat stitches from the front.
Purl stitch, picking style
1. Work the final stitch in the old color and insert the needle into the next stitch. Drop the old color to the far side (knit side) of your work.
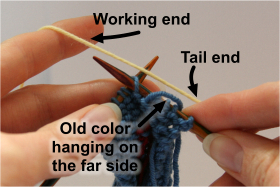
2. Pick up the tail end of the new color in your right hand and lay the yarn between the needle tips. Hold the working end of the yarn in your usual way.
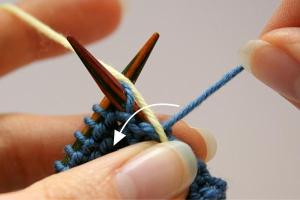
3. Keeping the tail of the new color in place with your left thumb, bring the old color back over the top of the new color. Hold both in place with the left thumb.
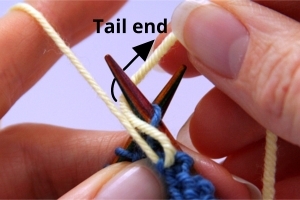
4. Shift the working end of yarn to the left of the right needle tip, then move the tail end under that needle (left to right). Keep hold of the tail.
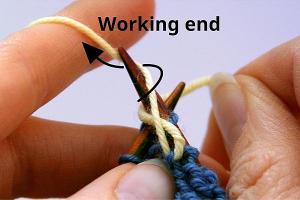
5. Move the working end of yarn around the needle as if to purl, but instead of forming the stitch...
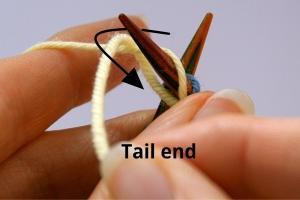
6. ...pull the tail end of yarn back down and around the needle...
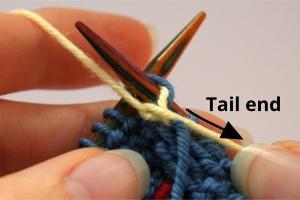
...which brings the working yarn round, ready to become the next stitch.
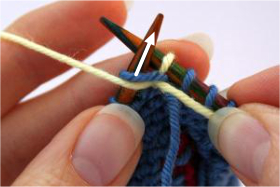
Complete the purl stitch in the normal way by pushing the worked stitch off the needle, while still holding the tail out of the way.
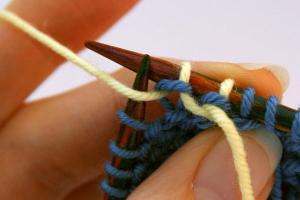
Purl the following stitch and then gently pull both yarns at the join to tidy the stitches.
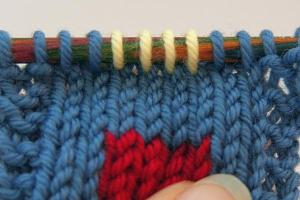
Neat stitches from the front.
I'd love to hear any thoughts or problems you have about this join - send an email to hello@yarnsub.com or leave a comment on the YarnSub Facebook page.
