Working stockinette stitch flat (as opposed to in the round) usually requires that you turn your work at the end of a knit row and purl back in the other direction. Both the turn and the purl stitch can cause problems.
Problems with purling
- It can be difficult to keep the same tension when purling as when knitting, leading to a striping effect on stockinette stitch, sometimes called 'rowing out'. That's why row gauge in the round, where you knit every row, is often different to row gauge working flat.
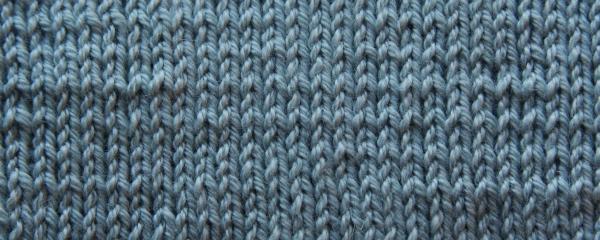
"Rowing out" - caused by different tensions for knit and purl rows.
Turning your work can be tedious. This is especially the case if you only have a few stitches on each row, or you're working on something cumbersome and heavy, like a big sweater or a blanket.
Some patterns are easier to follow if the front of the work is always facing. I always have difficulty keeping track of knit/purl texture patterns on wrong side rows for example; I have to keep turning to the front to check where I am. It's also easier to see where increases, decreases and yarnovers should be when you're looking at the front of the work.
Some knitters just don't like purling. When I asked my knitting group, comments ranged from "I don't mind purling, but I find knitting easier", to "I hate purl and try to avoid it at all costs!"
Solution: Knit backwards
Instead of turning and purling at the end of a knit row, you can work back along the row making new stitches and moving them to the left hand needle as you go. The yarn is moved in the same way as if you were making a normal purl stitch, but you create the stitch from the front side of the work instead of the back.
As there's no turning, the front of the work is always facing. Entrelac knitters, who work with only a narrow strip of knitting at a time, use this technique for exactly this reason. Frequently turning a heavy entrelac blanket is not fun.
Tension is often tighter when knitting backwards compared to purling - which would help with a rowing out problem.
And there's no purling. Okay it's not the normal knit stitch either, but you still might prefer knitting backwards to purling. Or perhaps you'll decide that purling isn't so bad after all!
The technique
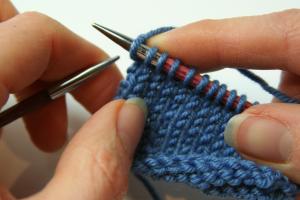
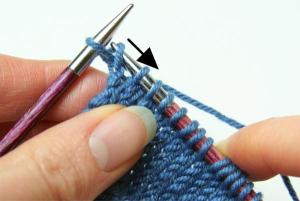
1. Work to the end of the knit row, but don't turn the work.
2. Insert the left hand needle into the back of the first stitch on the right hand needle

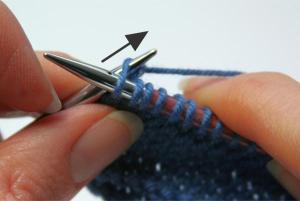
3. Hold that stitch in place against the needle with the left forefinger and bring the yarn up then over the left hand needle.
4. Bring the left hand needle down, under and round the right hand needle, picking up the loop of the new stitch on the way.
5. Once the new stitch is safely on the left hand needle, remove the right hand needle from the stitch of the row below.
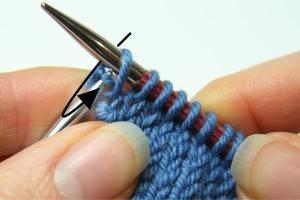
If you knit with the yarn in your left hand ('Continental' style) it can be tricky to get the yarn round the right hand needle. You can use the right finger to help pull the yarn round and over the needle, or push the left hand needle up to a vertical position which also makes it easier.
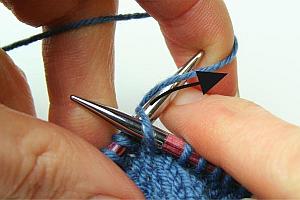
Getting the yarn round the needle while holding it in the left hand.
I've made a video which demonstrates the technique.
Building up speed and achieving an even tension won't come without practice, of course. While I was learning, neither the yarn nor my fingers would do what I wanted them to! It got easier, but you'll probably want to practice on something small where gauge doesn't matter too much. The Twisted Christmas Tree pattern is a great project for this. Any wobbles in tension become part of its rustic charm!
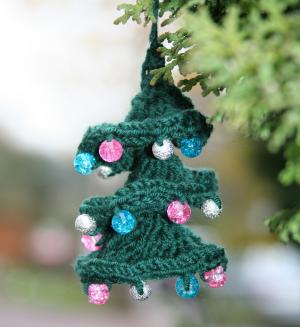
The Twisted Christmas Tree pattern is available to buy on Ravelry. It's a Christmassy way to practice knitting backwards!
I've made two videos to help with the pattern - the first shows the tree being made according to the original pattern instructions with a "wrap and turn" to make a short row before purling back. The second shows how to make a short row by wrapping the yarn around the needle and then knitting back instead of purling.
If you have any questions or comments send an email to hello@yarnsub.com or leave a comment on the YarnSub Facebook page. - Wendy