
I've found something that I've been looking for as long as I've been knitting—a neat, yet easy, left-leaning decrease.
I finally realized why a left-leaning decrease looks so untidy compared to the right-leaning K2Tog, and the fix is simple!
The Problem
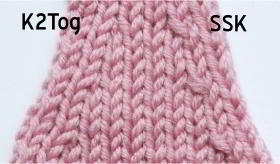
Right-leaning K2Tog vs left-leaning SSK.
Right-leaning decreases form a neat, straight slope across your knitting, whereas left-leaning decreases look more like a set of wobbly steps.
But what is it about leaning the stitches in opposite directions that makes them look so different? My lightbulb moment came as I was working on a previous YarnSub article.
I've written before about how a stitch becomes temporarily bigger as you insert the needle to work the stitch, which pulls in extra yarn. The stitch returns to its previous size as you move on and knit the next stitch.
At points in the knitting where there is no 'next stitch', this flow of excess yarn is stopped, leaving more yarn in that last stitch. This happens, for example, at the end of a row, or at an intarsia color change. It also happens in a left-leaning decrease.
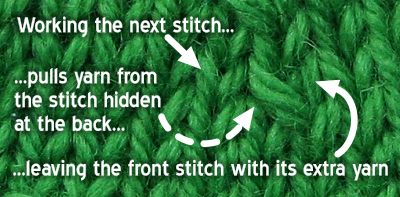
Extra yarn is trapped in a left-leaning decrease
There's no problem in a right-leaning decrease, since working the next stitch pulls yarn from the stitch at the front of the decrease.
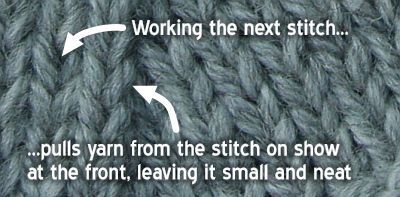
However, working the next stitch after a left-leaning decrease only pulls yarn from the stitch that's hidden at the back. The extra yarn in the first stitch is stuck there, right where you can see it.
Release the yarn to get a neat decrease
Manually moving the excess yarn out of the front stitch of the decrease makes it as neat and petite as a right-leaning one. The excess yarn doesn't cause any further problems, because the knitting process moves it along the row and away from the decrease stitch just as normal.
The final essential step
There is a last step needed to make sure the new stitch—the one you just made while doing the decrease—is also the right size. You need to pull firmly on the working yarn, as your new stitch will have become too loose as you've been pulling around the stitches in the row below. Without this step you fix the problem of an over-large decrease stitch but introduce a bigger stitch on the row above instead!
The Technique
Here's how you do it (or watch the video).

1. Work to where you want to decrease and insert the right hand needle knitwise into the first stitch.

2. Bring the needle behind the first stitch and through the back loop of the second stitch.

3. Take the working yarn round the needle, then bring the new stitch back out the same way you went in.

4. The right hand needle comes out between the two stitches. Push the first stitch off the left hand needle, but keep the second one where it is.

5. Pull on the loop of the second stitch until you've removed all the excess yarn from the first stitch, which should lie snug against the new stitch.

6. Let the second loop drop off the left hand needle. Don't worry if it looks big; excess yarn is pulled out as you work the next stitch.

7. The new stitch on your right hand needle will now be too loose. Pull firmly on the working yarn to bring it back to the right size.

8. Finished. Neat, small left-leaning decreases!
Notes
Working the decrease while keeping the stitches on the left hand needle is a little tricky at first, though I found it became easy with practice.
An alternative is to slip the stitches to the right hand needle just as if you were doing an SSK†:
- Slip the first stitch knit-wise
- Slip the second stitch purl-wise
- Put the left needle back through the front of the two stitches that you just slipped, and knit the stitches together, but only let the first of these stitches drop off the left needle.
- Pick up the tutorial at step 5, ready to pull the excess yarn out of the first stitch.
This version is also shown in the video.
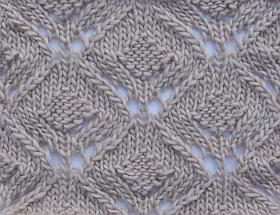
Lace swatch with K2Tog-L decreases.
I'll admit that I've been a little obsessed with untidy left-leaning decreases. After all, I've already made one attempt at fixing the problem—the slip-twist-turn decrease that I wrote about last year. That worked too, but it was too much like hard work. I didn't even use it myself if I could help it.
The K2Tog-L is different. I use it every time I need a left-leaning decrease, including in lace work. I love that I can work it without having to slip stitches to the right hand needle apart from anything else.
But best of all has been laying to rest the nagging thought that there must be some way of making a left-leaning decrease that matches the neat simplicity of a K2Tog. I think I've finally got it.
— Wendy
Share this article
Further information
Using different yarns
I wanted to be sure that the K2Tog-L works with a range of other fibers and yarn constructions, not just plied wool. Here's how they turned out.
Other knitting styles
I tried the K2Tog-L in different knitting styles. Working Continental style (i.e. holding the working yarn in my left hand) wasn't difficult and gave good results.
In the 'Eastern' and 'Combined' styles of knitting, the different orientation of the stitches on the needle makes the mechanics of performing the decrease different too. However the concept of manually pulling the excess yarn out of the front stitch and into the second still applies, and improves the look.
† Abbreviations
- K2Tog — Knit two together: a right-leaning decrease
- K2TogTBL — Knit 2 together through back loops: a left-leaning decrease
- S,K,PSSO — Slip 1, Knit 1, pass slipped stitch over.
- Slip-Twist-Turn — A left-leaning decrease that I wrote about last year. It gives a neat decrease but is complicated to work.
- SSK — Slip, slip, knit: a left-leaning decrease. Slip the first stitch knitwise, slip the second stitch knitwise. Insert the left hand needle into the front of these two stitches on the right hand needle, from left to right, then knit them together from this position, i.e. through the back loops.
- S(knit)S(purl)K — The same as SSK, but slip the second stitch purlwise.
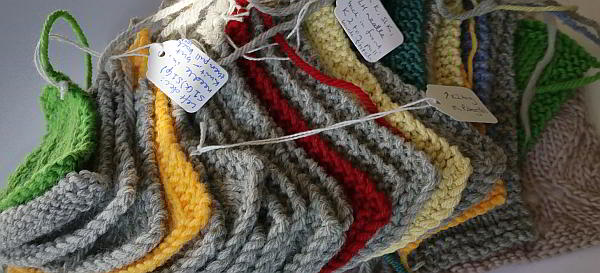
Q) How many swatches does it take to write an article?
A) 28!